Gold leaf technique

This page is about water-based gold leaf technique, suitable for use on paper, parchment, vellum etc. By contrast, outdoor gilding, signwriting, verre églomisé etc are all specialised techniques usually involving oil-gilding – which still uses standard gold leaf supplies but requires different tools, materials and method to get the leaf to stick on and stay on.
Any gold leaf technique – water or oil – is a function of gold leaf being startlingly thin, lightweight and fragile. It's so thin it's translucent; a whole leaf blows away across the room on a breath. And that character of gold leaf is determined by its manufacturers and users agreeing on the sweet spot between cost and practicality.
So before I get into details further down the page, I want to share the following morsel of wisdom. It's cheaper (and far more rewarding) to invest in the right tools to handle gold leaf than it is to keep wasting gold for years. A gilder's tip (broad brush for picking it up), cushion and knife make gold leaf technique easier and simpler. I tell you this as one who did waste gold leaf for years :-)
All right.
Now to the details.
Raised vs flat
Calligraphic gold leaf techniques divide pretty much into raised gilding and flat gilding.
Raised gilding is the kind where the gold looks like a smooth, solid lump on the page. It's 3D, and reflects the light very lusciously. It can be decorated with little indentations (tooled) for a more glittery effect.
Raised gilding in books and on pages is a variation on the most traditional gold leaf technique, water-gilding. So first up below is a Renaissance-type version of water-gilding. You can use this method directly on any rigid support (wood, board etc) or on rigidly mounted paper or skin. On flexible supports, it tends to crack, and come off.
After water-gilding, I'll discuss more briefly the variations on the technique which are used to create raised gilding on flexible supports such as paper or skin. This along with flat gilding is the technique of most interest to most calligraphers.
Flat gilding is just that: flat. It can look amazing: more nuanced and subtle than raised gilding, but also capable of appearing very dramatic in large areas. On the whole, it's easier to achieve, too.
Water-gilding: the 'elite' gold leaf technique
Ah, the breathless mystique of water-gilding. How long I lived in fear and awe of this supremely focused art which marries intricate manual dexterity with split-second timing and the cool focus of a Zen martial arts master.
So. Finally I took the plunge and learned water-gilding in person from a tutor in Renaissance painting techniques, using Renaissance-style materials. As a result I can tell you that if you are able to:
- persuade a cat to take medication and keep it down
- apply 2 coats nail polish to toenails and only toenails
- cause a plaster (bandaid) to adhere to the right place on a screaming under-5-year-old
- fill your own wine-glass while juggling shoulder-bag, plate of canapés, and wrapped gift
- defuse a time-bomb
then you were born to excel in water-gilding.
I'm going to give just a rough outline of the technique, as the basis for more calligraphy-friendly gold leaf techniques outlined below.
You will need at least 3 days, and: a support; gesso; gilding bole; cruddy brush for applying bole; preferably 2 grades fine sandpaper (as fine as it goes and one grade coarser will do); book of loose gold leaf; gilder's tip, cushion & knife – or else supreme genius in handling gold leaf with something other than the proper tools; water containing a few drops of size (usually rabbit-skin glue); a soft medium artist's brush (eg squirrel); a burnisher, preferably agate or haematite. Actually, a good novel too, for the waiting periods.
Here is how:
- Prepare the support (such as a piece of fibreboard, or oil-free non-warping wood, or pasted-down vellum): basically, make it clean, dry and not-too-porous, for example by applying one layer of dilute rabbit-skin glue and allowing to dry, then coating with successive layers of carefully mixed warm gesso, drying each coat for a period of between half an hour and a week, depending on your standards and predicted lifespan. (Find details of all this elsewhere. I mean. In the Renaissance they clearly had a lot of time.)
- Apply a thin layer of bole to the area to be gilded. It really helps if this area has smooth outlines, because trying to apply bole smoothly to a finely detailed shape is a nuisance. Bole, if I recall correctly, means essentially 'dirt' in Latin. It is, usually, a particular variety of fine, coloured clay mixed with the universal adhesive, rabbit-skin glue. (Which, btw, is not made with real rabbits anymore.)
- Allow the bole to dry. Not completely, but enough that it doesn't shift when you put the next layer on. Say, ten minutes.
- Repeat, repeat repeat repeat ... yawn ... till the bole's thick enough. How thick is thick enough? Well, thick enough that it won't sand right off again during the next stage. Then dry it out overnight. It has to be really dry to be sanded.
- Lightly, smoothly, sand and burnish the dry raised bole ... more ... more ... yawn ... Use two grades of fine sandpaper. Watch out for corners and edges where the bole will rub through easily. When it's perfect, burnish with agate, hematite, etc. Polish with silk or do whatever you can think of. Because every single mark on the bole is going to show on the gold. I mean a fingerprint is going to show. A minute difference in texture. A hair-thin scratch. It's uncanny.
- Sit down with the thing to be gilded comfortably in front of you. Cut your loose gold leaf sheet in four and position one piece handy on the cushion on your dominant side. Ready the gilder's tip by running it over your forehead for a bit of grease so the gold will lightly stick to it. Get your water 'n' size mix handy on the other, non-dominant side, with the floppy squirrel-hair brush ready in your hand. Use the tip to pick up the handy scrap of gold. Pick up some water. Bring both hands near the bole. Apply water to bole with one hand andIMMEDIATELYAPPLYGOLDLEAFwith the other, wafting it flat and even onto the water, in that second or two while the water is still shiny-wet on the surface of the bole. After the first couple of attempts it's not as tricky as it may sound. No, really, it's not. Well, O.K., yes it is, but it's fun too. The surface tension of the water 'sucks onto' the gold leaf, kind of grabbing it off the tip; meanwhile the bole is very quickly absorbing the water. The result is that the bole appears to suck the gold straight down onto its surface, where it sticks. Just try it and you'll get it. Here is the beating heart of this particular gold leaf technique and all the prep is meant to make this step work really well.
- Repeat until area to be gilded is covered. There will be overlaps. Brush off the excess (called, appealingly, 'skewings'), and collect them in a jar for making your own shell gold later in the afternoon. (Riiight.)
- Touch up the places that got missed or where the gold didn't stick, for some unguessable reason or other which is nothing to do with being an amateur.
- Allow to dry. Thoroughly, overnight at least, or more.
- Burnish carefully (with an agate burnisher, natch), using gentle, even pressure, hoping you paid the correct attention to all the previous steps.
- Admire like hell.
That's it. The slow and painstaking preparation of the surface, the laborious yet super-rapid application of water and gold, and the overnight drying stages all go some way to explaining why water-gilding seems (to me) the scariest gold leaf technique.
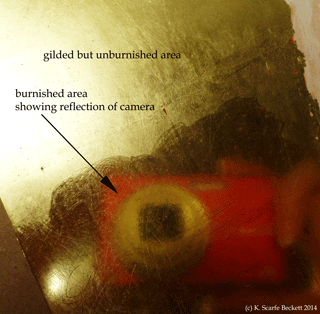
But it gives the best results. Bole burnishes to a mirror-like-gloss, and the gold adhering to it then looks amazing. Let me show you a photo from the class ... here we are.

It looks a bit scratchy because it is a bit scratchy: I did not use the super-fine sandpaper for those few extra hours (or, possibly, days) necessary to make the underlying bole surface absolutely smooth. But I can still see my face in the result. That is what 'mirror-like finish' means: creating a golden looking-glass.
Other water-based gold leaf techniques
Minus the gesso layers to start with (which are usually there as a painting base or to even up rough surfaces or create forms in picture frames), you can use the above water-gilding method in small quantities on flexible supports such as pages, but be warned that the bole may crack. The cracking can be a feature of course. Also, dabbling about with water on pre-written pages is not a good idea.
Therefore, adjustments are made to the technique as follows:
The gesso is made even smoother (gesso sottile) and combined with the bole
A flexible glue, traditionally fish-glue, is used, so the gesso doesn't crack or spring off the page as it flexes during turning or because of humidity warping
A humectant (water-attracter) is added to the gesso sottile
Raised gilding, but not that kind of raised gilding
Several manufacturers have come up with products that promise to make raised gilding super-easy and effortless blah blah compared with water-gilding. They are not necessarily better, not effortless, but they are easier and far quicker.
Return to the Calligraphy Skills homepage